
Stealth Hitches Hidden Rack Receiver - Custom Fit - 2"


To see if this custom-fit item will work for you please tell us what vehicle you'll use it with.


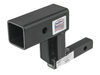
This completely hidden hitch keeps your vehicle looking like it just came off the assembly line. Remove the receiver for a fully concealed look when you're not carrying your bikes to the trail. Only for use with hitch-mounted racks and carriers.
Features:
Specs:
Note: This rack receiver is for hitch-mounted accessories only. The receiver tube included with this hitch cannot be used for towing.
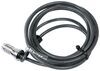
If you would like to upgrade this rack receiver for towing, you will need to purchase the Stealth Hitches towing kit (SH38QR- sold separately). The ball mount included in this kit inserts into the center block of the hitch in place of the receiver attachment. A 2" hitch ball is included with the ball mount, making it ready to tow with out of the box.
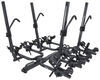
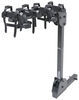
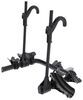
If you want to take your bikes to the trail with your family this summer, you have plenty of options. You can carry your bikes on top of your car with a roof rack, but that bulky rack can increase drag on your ride. You can use a trunk rack, but that's a pain to mount and it can scratch your car's paint. Or you can install a hitch on your ride and use a hitch-mounted bike rack to carry your bikes.
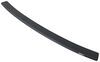
This rack receiver is designed to act as a mounting point for your hitch bike rack or cargo carrier. Just slide the shank of your carrier into the receiver for use, and when you're done you can not only remove the carrier, but the receiver as well, leaving your vehicle looking clean and unmodified.
Nothing can ruin the clean, stylish look of your vehicle like a giant piece of metal bolted beneath its bumper. Luckily, with the Stealth Hitches rack receiver, you never have to worry about messing up your vehicle's lines.
This hitch installs behind your bumper, keeping the cross tube concealed and leaving only the hitch receiver visible. Even better, the receiver can be easily removed from the cross tube when it's not in use so that you won't see any trace of the hitch. This means that you can retain that clean, from-the-factory look for your ride, while still being able to carry your bikes and gear on the next family road trip.
The receiver can be attached or detached in seconds with no tools required. To insert the receiver, simply pop the base up into the stainless steel block at the center of the hitch until it automatically latches in place.
Be sure to then press the lock on the side of the block to fully secure the receiver. When you're finished carrying your bikes or cargo, use the included key to unlock the latch. Then turn the handle on the block clockwise and remove the receiver. You can stow the receiver in a safe place, like your vehicle's rear cargo area, or you can use a convenient carrying case (391CASER - sold separately).
And when you're not using the receiver attachment, the included hitch plug covers the center block's opening to protect the hitch's body from dirt and debris.
At etrailer.com we're committed to the products we sell, and to our customers. Our experienced and knowledgeable staff are available via both phone and email to address your questions and concerns for the lifetime of your hitch. The technicians at etrailer perform hitch installations on a daily basis, making them a valuable resource for do-it-yourselfers. The one-on-one, personal service you'll receive comes straight from an expert in the towing and automotive field. We've installed it, we've wired it, and we've towed with it, so whatever your question, we can answer it.
 Alternate Instructions
California residents: click here
Videos are provided as a guide only. Refer to manufacturer installation instructions and specs for complete information.
Hey everyone, Ryan here at etrailer. Today on our 2023 Hyundai IONIQ 6, we're gonna be showing you how to install the Stealth trailer hitch receiver. Before we do that though, let's just check this out and see how it works. One of the best things about the Stealth hitches is the fact that the receiver tubes are detachable from the main body of the hitch. So believe it or not, we have the hitch installed on our vehicle here, and whenever you're not using an accessory, and you don't need to have the tube in it, this is how it's gonna look, you can't see a hitch at all. It's gonna look completely stocked, but when you're ready to use that accessory, you take your tube, you pop it up into the hitch, and now you'll have that opening there needed to put your accessory in.
I do wanna mention, with this Stealth hitch, this is gonna be just for accessories only, all right, like a bike rack or a cargo carrier, things like that. You can't take your regular ball mount, put it in here and and hook up to your trailer. It's just not rated for that. With that said, though, there is a Stealth hitch available. It's pretty much the same deal here.
They give you a special ball mount and some wiring to allow you to do that, but with this one, it's probably gonna be the more popular. I honestly don't see a lot of people out probably planning on towing with their IONIQ 6, but it is always out there and is an option for you if that's something that you're trying to get done. This is gonna have a two inch by two inch receiver tube opening, which is a good thing, 'cause that's a super common size, and so a lot of accessories will work with it. If you already happen to have an inch and a quarter accessory along with the smaller shank, Stealth Hitch does offer those size tubes separately that you can pick up and put in place there. That way you don't need to bother with an adapter if that's your particular situation.
I do like the appearance of the hitch, even when it's in place, you know, you're just gonna see this, it sits up pretty tight against the bottom of our vehicle, and the powder coat finish, it has a nice gloss to it and matches the plastic on the back of this vehicle's bumper really well. So no complaints there. Definitely even with the hitch in place, or with the tube in place, rather. It is going to use the standard 5/8 pin and clip, which doesn't come included with the hitch. If you need one, you can always get it here at etrailer, but a lot of times too, if you end up buying a new accessory, they'll come with one.
So something to look out for. As far as what this can handle, it's gonna have a pretty good weight capacity rating. It's gonna be 350 pounds for the tongue weight. All right, that's the amount of weight pushing down on the hitch. That's good for those one to three, maybe even four-bike rack racks, just depending on how much everything weighs of course, and the vast majority of cargo carriers, you should be in pretty good shape too. With that in mind though, I do always like to recommend always a good idea just to grab your Hyundai's owner's manual. That way you can check in there and make sure that your vehicle can handle that amount of weight safety. We'll grab some measurements now, and these will help us figure out what type of accessories will work best. You get from the ground to the top inside edge of the receiver two opening, it's gonna be about 11 inches. So if it we inchesre me and I was in the market for a new accessory, I'd probably try to get one that has a rise in the shank, just to get it up off the ground a little bit more, buy us some more clearance back here. And if you go from the center of the hitch pin hole to the edge of our bumper, that's gonna be about two inches, which is really good. So you shouldn't run into too many issues here, but if need be, you can use that to help figure out exactly if any of those folding-style accessories that you might have can be sorted upright without hitting the back of your Hyundai. When you're done using your hitch, to take it out, it's pretty easy. There is gonna be a lock here, which is nice, because once this is in place, you push that lock in and it keeps this secure. It does come with a couple of keys, and that's how you're going to unlock it. And so you'll pop it out like that. And in that position it's unlocked, and that'll allow us to turn the lever and drop the tube out. By turning that knob, this drops out of position. They also give you a couple little plugs that you can put in the bottom of the hitch underneath, just to keep debris and stuff out. So that's nice. And they also make carrying cases for these too. So if you wanna keep everything organized and in good shape, it's always something you could look into. But other than that, at the end of the day, this is a great solution for those of you with an IONIQ 6 wanting to, you know, put a bike rack back here, or something like that, having a super clean look, not taken away from the appearance, and still being able to get the job done. Now as far as the installation goes, believe it or not, it really wasn't too bad. You know, Stealth Hitch does a great job of really trying to make things clear and fit really well, and so it goes together pretty good. You don't really have to modify a whole lot, or anything, but it is a little tight, you know, just kinda awkward in some scenarios, trying to get bolts through and things like that. But take your time. You should be in good shape. If this is something you don't wanna mess with, or don't have the place to work on it, time, whatever the case may be, you can always use our dealer locator network, and that can help you find a shop in your neighborhood that can set something like this up for you. But if you're doing it yourself, hang around, we'll go ahead, pull into the garage and get started on it now. To begin our installation, we're gonna be underneath the back of our Hyundai here, and we'll have this big plastic panel that we're gonna need to remove. So there's a few different types of fasteners. One of them are gonna be push pin style. That'll just kind of run all along the length of it here. That's what these are gonna look like. And the way you get them out, you can just take a flat head screwdriver, pry underneath the head of it, and then you're able to pull the base out. So we'll just work our way around, and whatever, you know, wherever the panel's gonna be secured by these and pull them out. So with all of those removed, we can work on the different types now. If you grab a 10 millimeter socket, we're gonna have three of these nuts here. So one on each side and one in the middle. (tool whirring) And then if we move back to the middle, right there, there's a plastic nut. You can take a 14 millimeter socket, and I usually just undo these by hand. This should be the last thing holding the panel on. Sometimes with these you'll have to kind of apply a little downward pressure to the panel while you're loosening it up. We should be able to drop the panel down and set it off to the side. This little plastic tab here in the middle of our vehicle, we're gonna have to cut that off so it don't interfere with the hitch. So I just got a little pair of snips here. What you can do now, if you're looking how I am, you know, towards the back of the vehicle, from underneath on our frame rail, where the bumper beam is gonna be attached, there's gonna be two bolts. So one on each side. We need to get those removed. And from this point on, whatever we do to one side of your vehicle, we'll also do it to the other side, because it'll be set up the same way. And with these you can use a 12 millimeter socket to pull them out. (tool whirring) If you're looking at the vehicle from the back to the front where the bumper beam, you know, is pushed up against this bulkhead here, you can take a pry bar, a big screwdriver, or something like that, open it up, and I'm just gonna put a little piece of foam or something in there to keep it open. The whole reason being, there's a small opening in here that we're gonna have to use to get our hardware in the frame. We can get the hardware in our frame rail now. And just to note too, there was a small panel right here that I removed , really just for video purpose so we could see a lot better. Definitely don't have to take it off if you want to. There's just a few screws you can undo, but we're gonna have three attachment points on each side of our frame rail. All right, so there's one hole, two, and three. And what you wanna do, starting with the forwardmost hole, you can take one of the pole wires that comes with the kit, put the coiled end through there, we're trying to get it to come out of the opening behind our bumper beam. So I have it like that. Then you'll take a spacer block and a carriage bolt, we thread that onto the pull wire. And when these are sitting in the frame, you know, sometimes you feel the bolt kinda be off a little bit, almost kinda wonky feeling. That's because probably it's not in the spacer block. And when you pull these through, you wanna be able to work them and you'll kinda feel the head of the bolt click into there, like that, and you pull it all the way through. 'Cause you are gonna have to do one of these deals. Now push them up into the frame separately, pull it through like that, till it kinda locks into place there. And with the middle hole, something to think about too. If you're having a hard time getting the middle one going, your spacer blocks might be, you know, like that on each side, and kinda interfering with that. So just a pointer there, if it don't wanna seat, so to speak, that's probably what's going on. So I'm gonna use that same technique and that same hardware combination for our attachment points. (metal clanking) You can grab your little spacer block here, and the side plate, and the way these are gonna work, this spacer block will slide onto the bolts, and then the side plate will go on there. They do give you sticky tape, so I cut a little square of that. That way we can stick these together. It just makes it a little easier. But you wanna pay attention to the way you orient this, because this smaller hole here, this round hole, that'll be closest towards the back of the vehicle, and the side plate's gonna sit on there like that. All right, so you want the square opening to face towards the back of the vehicle. That's where the center section of our hitch is gonna bolt up to. So I'm just gonna line these up, stick them together there. And that tape's just lightly holding it in place. Honestly I don't want it to be too tight, so I have to kinda move this around. I could just kinda break that tape free and reposition it, but should be in pretty good shape there, and we can get this installed. Figured we'd just go over the other hardware that we're gonna use to actually secure this to the vehicle, just 'cause it's kinda hard to see, so we can more effectively demonstrate what's going on here. But when we go to put this up, you'll take your fish wires that's connected to the carriage bolts, push them through corresponding holes in the bracket. This will get pushed flat against the frame, and so your carriage bolts, you know, I'll just grab this one here to kinda show what we're talking about, carriage bolts will poke through like that, and you'll put a flat washer on the carriage bolt, split lock washer, and a hex nut. We'll get all these hand-tight, something too, 'cause as soon as you pull that fish wire off the bolt to put the hardware on, a lot of times you, when you wanna go and put the nut on, and everything, that bolt wants to fall back into the frame. It's something you can do, that I like to do. Let's say if this is our carriage bolt, I put the flat washer on, and then kinda put side pressure on the washer. That'll keep that bolt in place and make it easier to get that nut started without it falling back into the frame rail. We got our pull wires pushed through there. And you wanna keep a little bit of pressure on them pull wires while you're raising this up and get the side plate into position here. (metal clanking) And that's the trick with these too, just kinda finessing it, keep that bolt where you want it. You ideally do not want it to fall back into the frame. It's kind of a pain getting it out without the fish wire attached at least. Get that one loosely started. Do the same thing for this one, and then we don't have to worry about these two while we kinda move the plate up and down and pull that bolt back. What I did to get this other one out is just kinda pry it on the side for a little bit, continue to work it and it pulled out of there. Something else you can do too to help keep the bolt steady, take a flathead screwdriver, put a little side pressure on it, that way too. Tends to make it easier. Just another technique. You just wanna leave these hand-tight for now. Before we put this up, what I like to do is install this block here where the receiver tube will get plugged up into. And I like to do that now, because once this is on the vehicle, it's kinda buried in there and it's really hard to get to, and especially hard to torque. You know you just don't have a ton of room. So I find this to be easier in some scenarios, and this is one of them. The way you wanna position this, your tube, pay attention to how it's positioned. You know these little brackets, this is the top of the hitch, right So this down here, that'll be facing the ground. And so you want the handle to be on the passenger side. They're gonna give you these big bolts, (metal clanking) put both of those through. And nylon lock nuts. We'll come back with a 15/16 socket and wrench and snug them down. (tool whirring) I'm also going to torque these down now. Just get a little creative, stand on this cross beam. Not gonna hurt it, keep it in place. So tighten these down to the amount specified in the instructions. (torque wrench beeps) With an extra set of hands now, what we can do is line this up with our side plates. And that's why we left the plates loose, 'cause you will have to maneuver them a little bit, but you'll have this 1/2 inch bolt, you put it through like that. Where it comes out, you got a split lock washer and a nut. We're gonna use that same hardware for the other two openings there. You can come back now with a 3/4 inch socket and wrench and snug down those bolts that we just put in. (tool whirring) And then you can move over to the side plate hardware. Let's snug that down too. (tool whirring) With everything all snugged down, we can again come back with our torque wrench and get everything tightened to that amount specified in our instructions. (torque wrench beeps) Once you got the hitch all torqued down, you can take those bolts that we removed from our bumper beam and just go ahead and reinstall them The opposite way that we removed them. (tool whirring) You need to trim a portion of our underbody panel out so it'll clear everything. And there's a diagram in the instruction, so I just drew that out. And then just to help kinda give it a more finished look, I think I'm gonna radius these edges, so I just have a small hole saw here. I think it's probably an inch or so. And in the corners, (tool whirring) I'm gonna drill them out. It'll kinda give us that nice finished look when we go to cut everything else. (tool buzzing) If you want to, you can come back with a file or sandpaper, utility knife, and clean up some of these rough edge. Once you have this piece trimmed out, go ahead and get it reinstalled as well in the opposite way. Really the only difference is that little tab that we cut earlier, you know, you're not gonna have a piece to attach there, so you'll end up with one extra fastener left over. Panel back up. If you're not gonna be using your hitch anytime soon, you can just leave it how it came. If you wanna test it out, or whatever, though, you can unlock this. Take your receiver tube, push that up into position, lock it down, and now you have that opening for your favorite accessory. But with that done, that'll finish up our look at, and our installation, of the Stealth trailer hitch receiver on our 2023 Hyundai IONIQ 6.

Nice hitch. Great instructions. Took a little time but pretty easy to install as long as you have the right tools. I think I would have only cut about a 7” wide hole out of the bottom car cover(Ioniq6) if I would have thought about it before I already cut it. I would keep more rocks, dirt, water out from the underbody and not affect the hitch. But it looks good.
Biggest complaint, and why not 5 stars, is that it came with a 2” receiver hitch. No option to change it to a 1 1/4” receiver. I have a small electric car. I will never be towing. The 2” receiver is super bulky and it’ll probably hit pavement on bumps and dips quite a bit. I will be using for a bike rack only. Should be a 1 1/4” option while ordering. Etrailer doesn’t have them available so had to order from Stealth hitches themselves. $149 w/shipping. Ouch!
Very nice custom fit. Found good use for small frunk.
Info for this part was:
At etrailer.com we provide the best information available about the products we sell. We take the quality of our information seriously so that you can get the right part the first time. Let us know if anything is missing or if you have any questions.


Thank you! Your comment has been submitted successfully. You should be able to view your question/comment here within a few days.
Error submitting comment. Please try again momentarily.